My Garageband Continues to Download the Sound Files and Fails
Tom has written humor, poetry and training manuals for decades and decades...
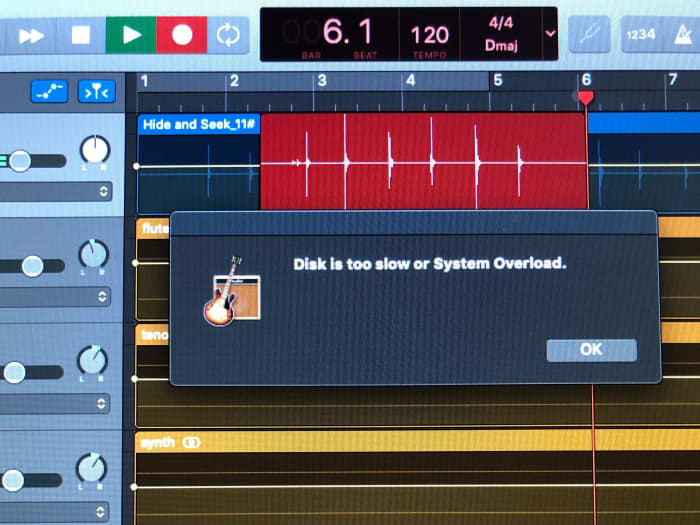
Are you getting a message that the disk is too slow or there's a system overload in Garageband? Read on to find out how to deal with it!
Photo by Tom Rubenoff
How to Handle Disk Too Slow or System Overload Messages in Garageband
The basis of this article is my own experience using Apple Garageband version 10+ on an iMac running macOS Catalina. The workarounds discussed herein may or may not be transferrable to other versions or operating systems.
For some years, I have enjoyed a productive workflow creating music using Finale music notation software, exporting the audio files from individual virtual instruments in .aiff format, and importing them into separate tracks in the Garageband application.
Once imported, I can apply Garageband filters and effects to each track, and so, for example, make the electric guitar sound much more like an actual electric guitar and the drum set sound more like an actual drum set. This method has allowed me to make music that comes close to the ideal I imagine. But lately, my productivity has been disrupted more and more often due to Garageband system overload.
Like me, you may be caught with a computer that is on its nth update of Garageband and has aged out of the O/S update queue, so is stuck on Catalina for the rest of its golden years—or hours, as the case may be. I want to continue using my iMac while I decide whether to buy the new version with the M1 processor (currently incompatible with Finale) or start a new digital life using completely different software with a Windows-based PC; however, as my iMac runs slower and slower and Garageband freezes more and more often, strategies are required.
In other words, necessity is a mother. And born of this necessity are these strategies.
Possible Solutions That Cost Money
Why Garageband System Overload Happens
The reason for Garageband system overload could be lack of realtime memory or may be a tired hard drive that has become too slow to keep up.
Memory
iMacs use DIMM memory modules to handle tasks like opening and/or saving applications, or in the case of Garageband, applying filters to audio playback. One solution to this lack of memory is (duh) to add more memory. Some iMacs are configured so that users can upgrade memory themselves, but many (including mine) are not.
Slow Hard Drive
If you have an older computer, it may have a mechanical hard drive instead of a solid-state hard drive. All hard drives get slower as they age, but solid-state hard drives age more slowly. A solution may be to replace your old, tired hard drive with a younger, more energetic one, such as might be available for your computer.
Free Workarounds
Read on to view methods that do not cost any money.
Close Other Applications
Every open application uses memory, and as software developers continue to 'improve' applications, every application tends to draw more and more memory as it is upgraded. Therefore, if you shut down every application except Garageband, Garageband will quite likely run faster and smoother, and therefore perhaps avoid system overload.
Scroll to Continue
Save Your Work
Saving your Garageband project periodically while you are working on it is just a good idea anyway, but it can also help the system overload problem.
Often, when Garageband gives you the system overload message, you can click OK, then go to the File menu and click Save , and this may free up enough memory for you to continue creating your piece. Sometimes you might have to do this two or three times before it will take, but after that, it may be relatively smooth sailing.
Use Fewer Filters
Adding pedals to your pedalboard or plug-ins to your tracks increases the memory load and may cause Garageband to overload the system. Sometimes the sound that you want can be produced by manipulating the graphic equalizer or amplifier settings, which are less likely to produce system overload.
Eliminate Tracks
Word to the wise, but sometimes a piece will sound better if you delete a particular track altogether. Of course, if you are recording your band, you are not going to eliminate one of your bandmates! But if you are using electronic instruments, you have no risk of bruising anyone's ego but your own. You can experiment by muting a track and listening to the piece without it. If it sounds better without that track, then, bingo! Out it goes.
I have found often that the track I end up eliminating is one that no amount of filters could fix, and was never going to sound the way I wanted anyway.
Select tracks to export by clicking the Headphones icon
Photo by Tom Rubenoff
Share menu: Export Song to Disk
Photo by Tom Rubenoff
Combine Tracks
You can have your cake and eat it, too! Prevent system overload by building your piece four tracks at a time, or work around system overload by consolidating multiple tracks into a single track.
Example 1: Preventive: Your piece will be composed of sixteen tracks.
- Create four tracks and record or import your sound files
- Apply all your filters and regional settings
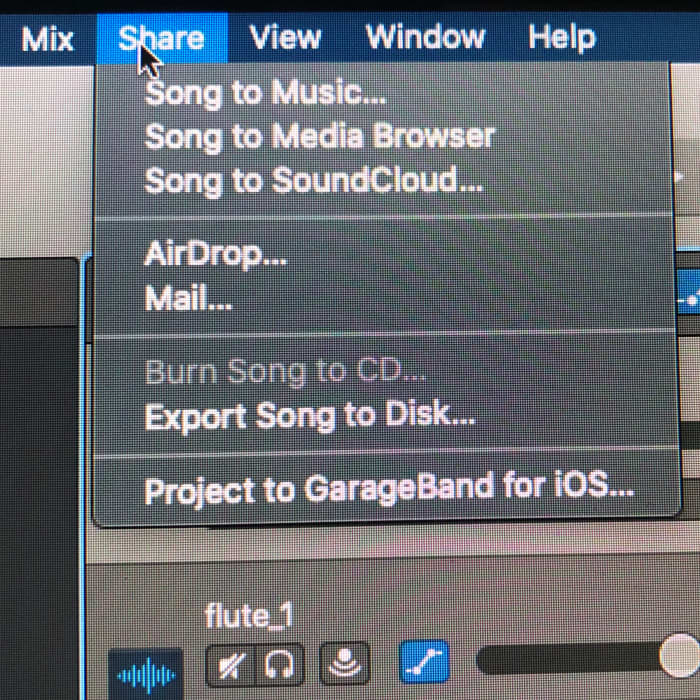
- Go to the Share menu and select Export Song to Disk . This action will export the tracks all as one sound file to a folder on your computer. All your filters, settings, and effects will be preserved in the combined sound file. Save the file in a place where you can find it, and name the file so that you can recognize it.
- Delete the four tracks in Garageband and create one new track
- Import the exported sound file to the new track. (Find the sound file you created and drag it over to the Garageband track.)
- Repeat for the next four tracks and the next four. In this way, you will have reduced the number of tracks from twelve to three, and you can import or record the final four tracks in the normal way to complete your piece. System overload will be much less likely.
Example 2: Reactive: You have created a piece with sixteen tracks, and System Overload starts happening.
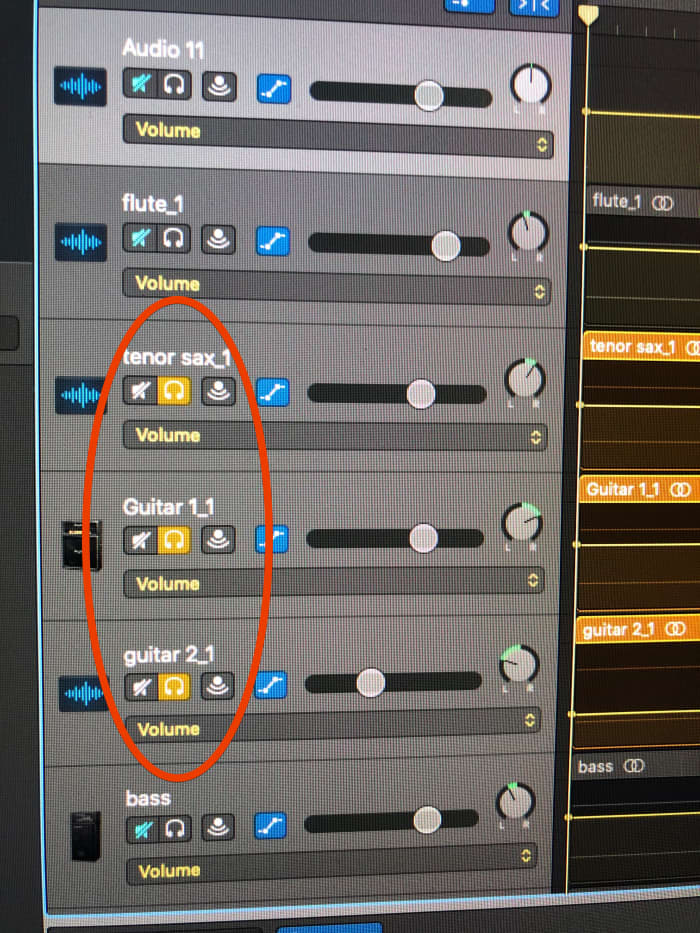
- Choose four tracks that you regard as complete by clicking the Headphones icon on each track. The other tracks will appear greyed out.
- Go to the Share menu and select Export Song to Disk . This action will export the selected tracks as one sound file to a folder on your computer. All your filters, settings, and effects will be preserved in the combined sound file. Save the file in a place where you can find it, and name the file so that you can recognize it.
- Delete the selected tracks and add a new track.
- Import the exported sound file to the new track. (Find the sound file you created and drag it over to the Garageband track.)
The downside of either of these methods is that you cannot edit the individual tracks after they are consolidated; you can only edit them as a group. So if, for example, you add the vocal and the balance is now way off, you may have to delete the consolidated track, reload the original individual tracks and re-edit them.
The bottom line is that none of these workarounds are perfect, and even the hardware upgrades discussed in the first part of this article may not totally solve the problem. At best, the solutions offered here are temporary.
The lesson I learn from Garageband system overload is that the next time I buy a computer, I'm going to opt for the most memory and hard drive space I can afford, so hopefully, I will not see this error message again for a very long time.
Source: https://turbofuture.com/computers/Garageband-System-Overload
0 Response to "My Garageband Continues to Download the Sound Files and Fails"
Post a Comment